
It’s been the plan from day one to keep chickens, though it’s taken rather more days than that to get around to it. Keeping chickens is one thing. Exactly how to keep them is another. Free range? Tractor? Permanent pen? All have their fans among the chicken-keeping world and all for persuasive reasons. I thought I had it sorted in my head many times, but then I’d come across an advocate of another method or someone’s bad experience with the method I’d decided on and it would send me off back to the drawing board again.
Back in Scotland, our chickens there had a permanent pen we inherited with the property, but most of the time we let them out to range free around the garden. The Portuguese, on the other hand, almost universally keep them penned into permanent compounds with thick wire and often solid concrete bases. This seemed a bit brutal to me. Left to their own devices, chickens spend a lot of their day scratching up the soil in search of larvae and worms, or sculpting out dust baths. They can’t do that on concrete. Coupled with the frequent presence of guard dogs chained nearby, their imprisonment seemed to epitomise the more utilitarian attitude that prevails in respect of domesticated animals here.
But the proximity of the guard dogs is no accident. Chickens are a favourite on the dinner menu for rather too many of the wild and semi-wild animals that hang around the periphery of human habitation here, and there are a lot more of them here than there are in Scotland. Not just foxes and the odd free-ranging dog, but mongoose, pine martens, genets, wild cats, hawks, eagles, rats, snakes … If I wanted to keep chickens, with the emphasis on keep, then they would need predator-proof accommodation.
So a robust and permanent coop was required, even if I free-ranged or tractored them during the day when our presence on the land would deter all but the most ravenous of predators. At the beginning of last May I decided the bottom terrace would be a good location for permanent housing for them. I picked a north-facing spot which gets the least amount of direct sun in summer and started work on the base of a coop, putting in a level platform and the beginnings of a supporting framework. Then, what with the building and the garden and everything else, it got put to one side and mostly forgotten about until New Year when once again I started to think about chickens.
A week ago some friends went to visit a local chicken breeder and I tagged along. There were chickens ready, a month or so off point-of-lay. The perfect number for all of us to have the number of chickens we wanted. So that was it. I had to finish the coop.

The platform for the chicken shed, completed last May

The first side wall takes shape. The walls are double-skinned with a layer of insulation between to keep out 2 more chicken killers: winter pneumonia and summer heat. The wooden planking is offcuts and rejects from the reroofing and reflooring of the buildings, or pieces that have previously been used for shuttering and other construction
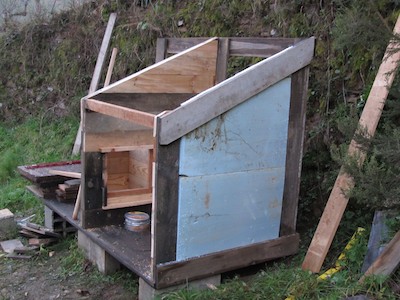
The second side wall waiting for cladding. Yes, the insulation is the very unnatural, unsustainable and unecological blue polystyrene sheeting, but it was left over from the battery house construction and was the perfect thickness for the job. We are aiming to send NO waste from our building projects to landfill
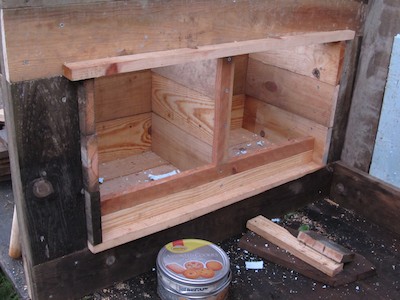
Nesting boxes. 2 of them

The nesting boxes, external view. They’re accessible from the outside of the coop where they’ll also be under cover, keeping temperatures inside cooler in summer and the nests (and the egg-collector) dry when egg-collecting during downpours
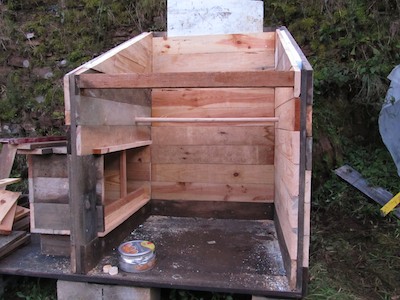
Side walls and back wall complete, roosting perch in place

Roof on. On the inside of the coop section of the roof is some left-over 50mm cork insulation, on the outside foil-backed bubble wrap serving as both extra insulation and waterproof membrane

Foundation layer of cana (Arundo donax) thatch on the roof, start of the door frame in position

Door with access hatch complete

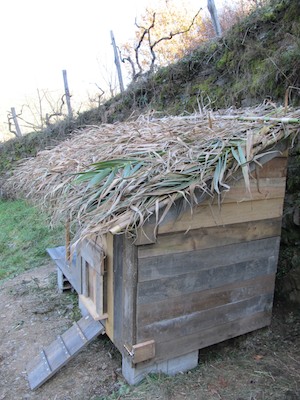
Ramp to access hatch and cana thatch complete. The covered verandah has hooks for hanging grain and water dispensers at chicken head-height. It keeps things a lot cleaner than having them at chicken foot-height …

The top layer of cana thatch is held down by 2 cana poles lashed together and tied down under the roof eaves

Close-up of lashing
Thatchwork complete

Close-up of access hatch and ramp
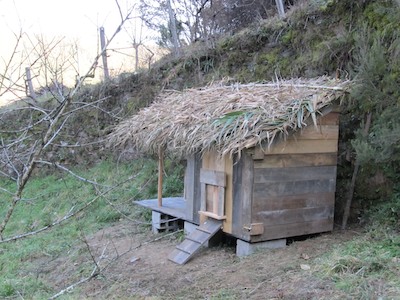
Finished!
The chickens are due to arrive on Thursday. So I have 3 days in which to fence off a compound for them for use when they’re not being free-ranged or tractored. Yes … in the end I decided on a combination of all 3. At least until we’ve discovered what works best for us and the chickens.
Andrea February 5, 2012
Lovely cana thatching. How often will it need replacing?
Quinta do Vale February 5, 2012
Your guess is as good as mine! We’ll just have to see … I have no idea how it will hold up to the ferocious gusts of wind that occasionally barrel down this valley like runaway express trains during the autumn gales – that was the logic behind lashing the top layer down with the cana poles, though by next autumn they could be too brittle to be of much use so roping the whole lot down across the full extent of the roof may be a better option – but we generally cut most of the cana each year to keep it vigorous and upright instead of straggly and falling all over the place and getting in people’s way, so it’s a good use for the trimmings if nothing else.
Andrea February 5, 2012
It sounds like the end of the world outside right now, so if you’re having the same weather us I reckon you’ll know the answer by tomorrow morning ;)
We planted some cana a couple of months ago, so hoping it’ll take off this year.
Quinta do Vale February 5, 2012
Really?!! Wow! No. It got cloudy after about 1pm and everything started defrosting but as of now all is still calm and still.
Apparently, so I’ve been told by a local, cana will always spread in a southerly direction from where it’s planted. That’s certainly true of our 2 stands of it.
Andrea February 5, 2012
Wish I’d known that BEFORE I planted it!